> ## Documentation Index
> Fetch the complete documentation index at: https://docs.nodaldata.io/llms.txt
> Use this file to discover all available pages before exploring further.
# Share with your team
> Point your team's agents — Claude, OpenAI (Codex), or Gemini — at your hosted Nodal MCP endpoint.
Sharing Nodal with your team means pointing every teammate's agent at your hosted endpoint. Pick the
vendor your team uses — **Claude**, **OpenAI**, or **Gemini** — and each has a CLI coding agent (which
reads a config file, often one you commit to a shared repo) and, in most cases, a desktop app.
**Use exactly `https://analyst.nodaldata.io/mcp`** — no trailing slash — as the server URL
everywhere. That's the only value any client needs: sign-in is handled server-side, so there are
**no OAuth client IDs, callback ports, or token URLs to configure** in any agent.
## Step 1 — Provision once (admin)
In the [Nodal admin](https://aiden.nodaldata.io):
1. **Subscribe** to activate your organization's endpoint.
2. **Connect your analytics-context repo.** The default flow installs the **Nodal GitHub App** —
click through GitHub's install screen and grant it access to just the repo you pick. Nodal reads
the repo to serve your context and can **write back**, so your analyst can edit definitions and
open pull requests from the admin. No token to generate, copy, or rotate. *(Prefer to manage a
token yourself? You can [paste a fine-grained token](/mcp/connect-github#prefer-a-token-instead)
instead.)* [Full GitHub setup →](/mcp/connect-github)
3. *(Optional)* Connect your **dbt project repo** — **read-only** — to enable the lineage connector.
Nodal can never edit your dbt repo.
That's the entire access footprint — GitHub only, with write scoped to your context repo. **No
database connection is ever requested.** [Details →](/mcp/data-access)
## Step 2 — Connect an agent
Every agent points at the same Nodal HTTP server — only *where* you enter it differs. **Pick your
vendor**, then the specific app. Each vendor has a **CLI coding agent** (reads a config file) and, in
most cases, a **desktop app** (each teammate adds a connector once in settings).
Claude Code reads a **`.mcp.json` at the repo root** — that's *project* scope: committed to
the repo and shared with the team. Drop this at the root of a repo your team shares, and any
teammate whose Claude Code opens it gets the Nodal tools:
```json .mcp.json theme={null}
{
"mcpServers": {
"nodal": {
"type": "http",
"url": "https://analyst.nodaldata.io/mcp"
}
}
}
```
Prefer the CLI over editing the file by hand? `claude mcp add` with `--scope project` writes
that same repo-level `.mcp.json`:
```bash theme={null}
claude mcp add --scope project --transport http nodal https://analyst.nodaldata.io/mcp
```
**Want it in every repo, not just one?** Use `--scope user` to register the server
**globally** — it's then available in every project you open, with no per-repo file:
```bash theme={null}
claude mcp add --scope user --transport http nodal https://analyst.nodaldata.io/mcp
```
URL only — no `oauth` block, no pinned callback port. Run `/mcp` and log in through the
browser on first use. For team distribution, committing the repo-level `.mcp.json` is the
whole mechanism; the global `--scope user` route is best for individuals who want Nodal
everywhere.
Desktop apps have no repo config file — each teammate adds the connector once in the app's
settings:
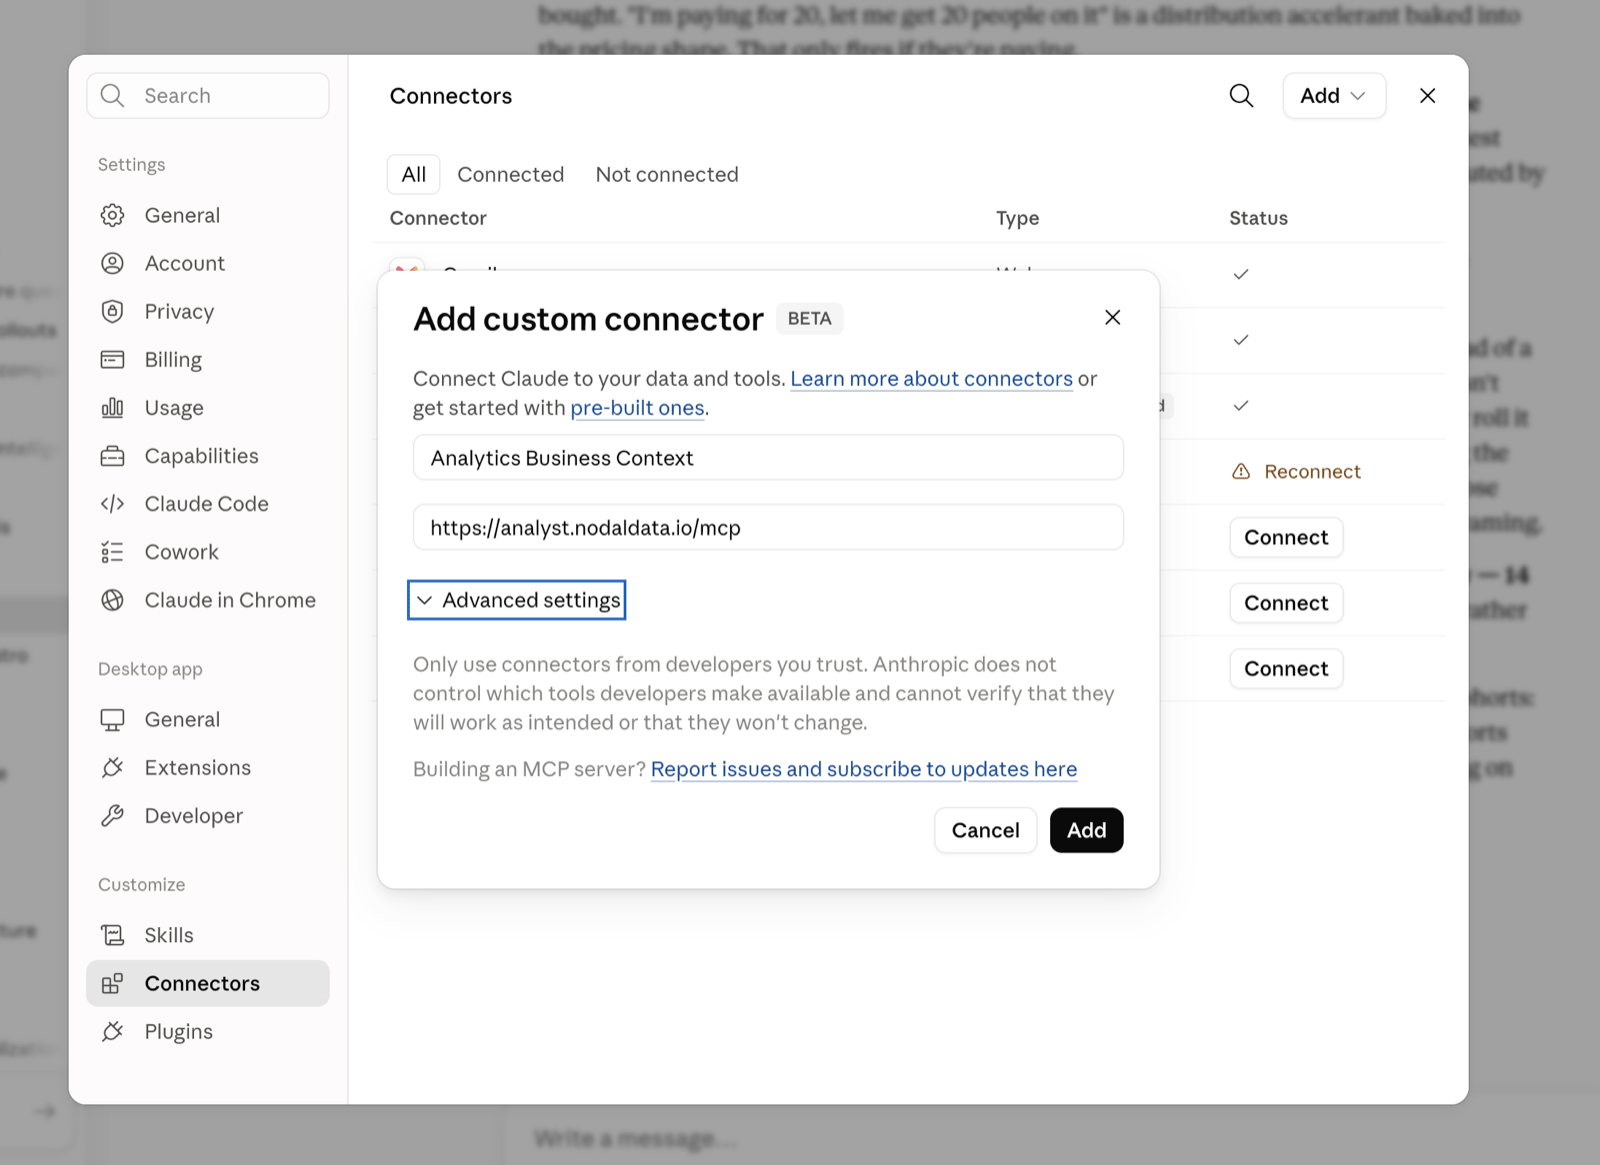
1. Open **Settings → Connectors** and click **Add custom connector**.
2. Fill in two fields:
* **Name** — anything recognizable, e.g. `Analytics Business Context`.
* **URL** — `https://analyst.nodaldata.io/mcp`
Leave **Advanced settings** untouched — no client ID or secret to enter.
3. Click **Add**, then **Connect** to run the sign-in flow.
Add the server, then log in — no callback-port setting to configure:
```bash theme={null}
codex mcp add nodal https://analyst.nodaldata.io/mcp
codex mcp login nodal
```
`codex mcp login` opens the browser for sign-in. (Equivalently, add
`[mcp_servers.nodal]` with `url = "https://analyst.nodaldata.io/mcp"` to
`~/.codex/config.toml` by hand — nothing else is needed.)
Unlike Claude Code's repo-level `.mcp.json`, **Codex has no committed per-repo MCP config** —
`~/.codex/config.toml` is global to the machine. So there's nothing to commit for the team;
each teammate runs `codex mcp add` once and it applies across all their projects.
Add the connector once in the app's settings:
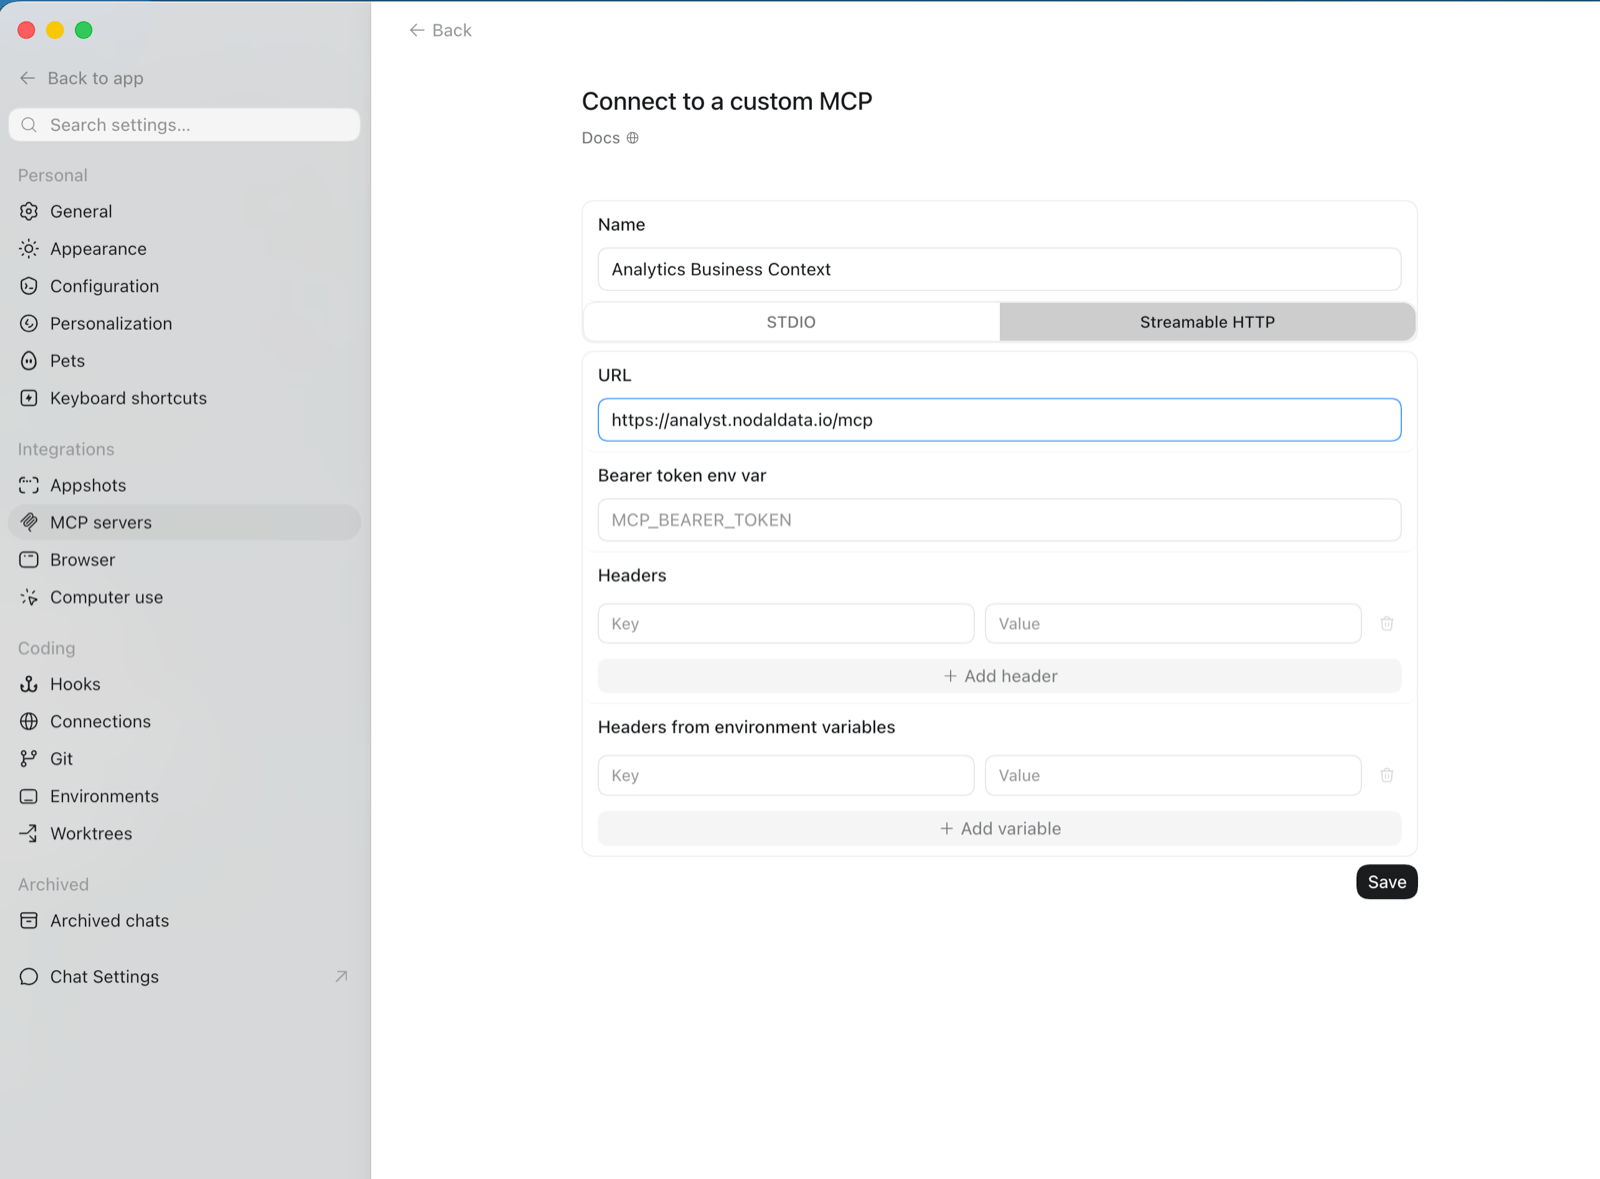
1. Open **Settings → MCP servers** and click **Connect to a custom MCP**.
2. Fill in:
* **Name** — anything recognizable, e.g. `Analytics Business Context`.
* **Transport** — select **Streamable HTTP**.
* **URL** — `https://analyst.nodaldata.io/mcp`
Leave **Bearer token env var** and both **Headers** sections blank — sign-in is handled by
OAuth, not a token.
3. Click **Save**, then complete the browser sign-in.
Add the server to `~/.gemini/settings.json` — just the URL and OAuth enabled:
```json ~/.gemini/settings.json theme={null}
{
"mcpServers": {
"nodal": {
"httpUrl": "https://analyst.nodaldata.io/mcp",
"oauth": { "enabled": true }
}
}
}
```
Don't set `authorizationUrl`, `tokenUrl`, or `redirectUri` — Gemini discovers them from the
server. Gemini's [random-callback-port behavior](https://github.com/google-gemini/gemini-cli/issues/14419)
no longer matters: any local port now works. *(Gemini CLI only — there's no separate desktop
connector app; `~/.gemini/settings.json` is global to your machine.)*
## Step 3 — Authenticate
The first time a teammate's agent reaches the endpoint — on first tool call for Claude Code and
Gemini, at `codex mcp login` for Codex CLI, or on **Connect**/**Save** for the desktop apps — it
runs the standard **OAuth 2.0** flow: a browser opens, the teammate signs in, and a token is issued
(scoped to your organization). No API keys, client IDs, or callback ports to configure.
## Verify it worked
Ask a question your context covers. The teammate's agent should call the Nodal tools (for example
`get_business_context` or `search_corpus`) and return an answer grounded in your definitions. See
the [tool reference](/mcp/tools) for what's available.